A note about the photos.
These have been drastically reduced in size to make them download quickly. The originals are more than 5 Megabytes each and much, much sharper. This means you are not seeing just how good the image quality from the camera really is. But even these low resolution pictures will provide some idea of what the Digital Super-Zoom cameras can do.
The Fuji Finepix s8600 replaced my Finepix s1500. The s1500 had an optical zoom of 12x and digital zoom extended that quite a long way.
The s8600 has optical zoom out to 36x. The 2 x digital zoom takes maximum zoom to something like 72x though takes a bit of getting used to as the moon shots in this first section and the long distance photos below will show. It is hard to hold a camera steady at those magnifications, especially at the slow shutter speed used in night time pictures.
Click on any image to see it larger, although it will still be in low resolution.
The first two were taken on one night and the other three were the following month on a not so clear night. I was very surprised that at such a high zoom I could still see the definition of the craters on the first night very clearly.
All of these photographs of the moon were taken while holding the camera in my hands and not braced against anything, All were taken with the camera set to 'SR-Auto' mode. Using Scene Recognition Auto allows the camera to set the ISO, Aperture and Shutter Speed to a good average for the conditions. In this case - Night.
I have taken thousands of photographs, but I've never really been interested in the photography itself. I use photographs to record where I've been or moments that I want to remember. I have rarely ever sat and deliberately composed a photo. I know about the rule of thirds and depth of field, ambient lighting and shutter speed, but they have never really interested me until I began printing some of my happy snaps for commercial use. Basically once I got a digital camera i set it to one of the 'Auto' modes and just pointed and clicked.
Then I discovered just how hard it is to try to fix a badly exposed or coloured photograph so that it would look acceptable on a wall or perhaps printed on a tee shirt or a coffee mug.
When I had to choose a replacement camera it really came down to the usual decisions about the cheapest camera that would do a reasonable job, had a better zoom than the last one and that the zoom would work ok without a tripod, even from the deck of a moving yacht. Because I am getting older and have had a lot of physical injuries my hands shake and I cannot brace myself in a set position for long, The last option is becoming more difficult to find. All my cameras use rechargeable NiMh AA size batteries. When I travel I carry a single charger that can charge a mixed group of AA and AAA NiMh and my Li-Ion 18650 batteries.
I decided with this most recent camera to begin exploring some of the settings to take me away from Automatic Modes and look at getting better images.
In particular I want to explore:
 Zoom, but maintaining reasonable detail. This is hard to do at 72x zoom whilst using the camera handheld (no tripod).
Better, more vibrant colour. I only discovered this little gem last week.
Composition. I really don;t care much about the rule of thirds. I take pictures for myself and I quite like the horizon splitting the frame. But I should make a little more effort with composition in positioning objects in the frame.
The two photos above are of the same islets at standard Wide Angle, and at Full Digital Zoom. They are approximately 4.5 kilometres away from the camera and taken on SR-Auto mode.
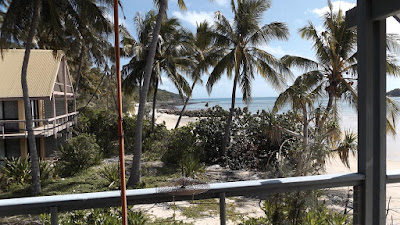
These two photos were taken looking from my balcony, along the beach to the jetty. If you look very carefully at the top photo you can see the jetty almost in the centre of the picture. Again, hand held - no tripod, and taken in Auto mode. The distance from the balcony to the jetty is a little over a kilometre (1160 metres).
The rocks in this next one above are a bit harder to see in the top pic, but again they are almost in the centre of the photo. It was a hazy day and they are not very well defined. The distance was 7.6 kilometres.
This last set of three are wide angle (what you get when you first turn the camera on), Full 36x Optical Zoom, and Full Digital Zoom. Just to show the three standard settings.
Distance from the camera to the cliffs zoomed in the bottom photo was a little over 18 kilometres. Again, the day is hazy, but quite a lot of definition can be seen in the cliff face, especially considering they barely show at all in my 10x50 binoculars.
On a clear day, the camera is quite capable of far sharper images, and they would probably be better if I could be bothered using a tripod. As it is, the haze can be cut and the detail brought out in a couple of clicks using the free image editing program GIMP (for Windows, Mac and Linux). See the same image below:
So that is what you get using a camera that cost $167 (on special at Australia Post) using Automatic settings on zoom, without a tripod.
The next post will explore a first look at what happens when you play with a few manual settings.


No comments:
Post a Comment