Tuesday, October 11, 2016

LCD screens vs Electronic Viewfinders in digital cameras

In recent years camera manufacturers have begun to produce more digital cameras with only the LCD screen for viewing and composing the shot.  With ever brighter and higher resolution LCD screens available, it is an obvious advantage in some respects, ut in a country like Australia it is almost impossible to see the scene on a sunny day, meaning most photographs are taken by guesswork.

That often leads to the wrong decision at the time of purchase because the buyer either loves the camera features and forgets he (or she) won't ever be able to see what he is taking a photo of on a bright sunny day, or the decision to buy a camera that doesn't have what we need, but does have a separate viewfinder.

My Fuji s1500 has a separate viewfinder and when I ordered the s8600 I didn;t even think to check whether it had one.  When I bought a second hand Panasonic LUMIX FZ70, one of the most important considerations after the incredible price, was that it had a separate viewfinder.

Which brings me back to the Fuji s8600.  Th Fuji has a nice LCD screen and there are times when I prefer it to the Panasonic.  But I was using it less and less simply because I could rarely see what I was trying to shoot.  Then I made myself a simple hood for the back of the LCD screen.  Getting my eye at the right distance to focus however was an issue, so I added a lens.  The right focal distance was still an issue, but it sort of worked.

So I was searching ebay for a jeweller's loupe with the focal distance I wanted and found a collection of LCD viewing hoods for around $5 to $6.  I ordered one.

This is what I got.
A piece of metal frame with some double sided tape to attach it to the camera.
The plastic hood, complete with a lens and a rubber face cup
And the base of the hood has 4 strong magnets that attach it very firmly to the frame.

Installing it was easy enough using the instructions.  Focus was not good.  For my eyes I needed almost an extra centimetre of distance, so I cut off the end with the lens, made a tube, taped it into place and had excellent focus immediately.

It might look a little ungainly, but remember without it, I would be holding the LCD screen far enough away from my face that my eyes focus on the screen.  With my eye pressed lightly to the hood the camera is in a perfect position and the focus is great.  For the first time since I've had this camera I can actually see exactly what I want to photograph.  It is so good that I am considering another hood for the Lumix.  At $6 including delivery it just makes everything so much easier.


Saturday, July 9, 2016

Fuji Finepix s8600 Intro to some basic Settings.

The picture on the left was taken with the Finepix s1500 in Auto mode.   The picture on the right?  Well, I just can't help trying to make wall art from photos.

With all equipment, there is one step so many people simply forget to do.  RTFM  (better known as Read The 'Friendly' Manual).  The Fuji Finepix s8600 comes with a 76 page manual on disk.    It goes into all the initial setup options and has basic operation information.  Some things i will skip over are covered in detail in the manual.  I will mostly talk about what I do and the settings I am playing with to get certain results as I learn them.
The manual is also available here online for download.
http://www.fujifilm.com/support/digital_cameras/manuals/pdf/index/s/finepix_s8600_manual_en.pdf

NOTE !!!   The Finepix s8600 (and s1500) has a 'Setup Menu' and a 'Shooting Menu'.  One trap for beginners is that the Shooting Menu options change depending on the mode you are in.  So for example, you will not find the options to change AF (Auto Focus) methods in certain modes.  In other modes you can select how the camera focuses on objects in a frame.  Be aware of this when you are looking for an option you are sure you saw once but cannot find now.  Chances are you changed to a different 'Mode' on the dial.  

The Fuji Finepix does a fairly good job of guessing the settings to use for various scenes and lighting.  But with a little tweaking you can switch to Manual mode and fine tune it.  When you first get the camera and go through the setup menu one of the options you will come across is called 'Finepix Color'.

You have three options here, Std, Chrome or B.  B is black and white.  Std is standard colour mode and Chrome is a digital interpretation of what we used to get with 35mm film labelled Kodachrome or Fuji Chrome etc.  It just makes all the colours a little brighter and prettier.  I usually have my camera set to the Chrome setting - I just like it that way.  Sometimes I use standard for photographs in the Australian bush I and forget to change it back.  Then the colours look drab.

I always have the IS (Image Stabilisation) turned ON in the setup menu because I do not use a tripod. If you decide to use a tripod the manual suggests turning IS Off.

Something that takes getting used to is the focus options.
As is the case with most Compact Super-Zoom digital cameras, there's no manual focus ring.  The camera relies on a computer sensor to focus.  In theory this is great and indeed it works well in most situations where the subject is not far away.  But over long distances in unusual conditions I would kill for a manual focus.  having said that, when I view my photos on a  computer, even at full digital zoom I am amazed by how clear some images are.The moon photos are an example.   There's no way I really expected the 'auto focus' on a very cheap camera to bring some craters into sharp definition across the several miles from earth to the moon, but on a clear night, it did!  It shows how good the computer chips and optics are on budget equipment these days.

I noticed lately that I have my camera set to Auto Focus on 'AREA'.  I found that because I am often focusing on something about a kilometre or more away I was getting a great detailed picture of a palm leaf 20 metres away, but the boat I wanted in the picture 1200 metres away was blurred.
Switching AF mode to 'AREA' solved most of that.  I had been getting very, very frustrated with the out of focus images until I discovered that little gem.  In fact for a while I wondered whether I should have bought a different brand of camera!

Focusing this type of camera is pretty simple.  You aim the camera at the object you want to photograph, hold the shutter button half way down, wait for a 'beep' to say the camera thinks it is focussed, hold very steady and gently squeeze without moving the camera body.  That's it.  I still prefer a manual focus ring, but very few Super-Zoom cameras have one and I'm not paying an extra $500 just to have a manual focus option when the Auto Focus works very well.

Ok, back to the camera itself.

On top of the camera there's a round dial that lets you switch between various modes.

When you first get the camera, the best setting to use to get the feel of it is SR-AUTO.  SR stands for Scene Recognition, and that is pretty well what happens.
    In this mode the camera tries to determine whether you are shooting inside, outside, in sunny conditions or at night and various other options.  So if the lens is very close to an object the camera switches to Macro (very close up) mode.  If you try to take a picture of something a mile away it will switch to Landscape more and so on.
   
The next most useful mode is probably SP (Scene Position).  This is somewhere between going to full manual mode and auto mode.  You manually select the type of scene you are photographing and the camera sets what it thinks are best.  It also varies the Aperture and Shutter Speed accordingly.
There are two SP settings on the camera and it took me a while to work out why.

It turns out you can set SP1 and SP2 for different things.  So if you take a lot of Landscapes and often take pictures of Sunsets, you can set SP1 to Landscape and SP2 to Sunset and quickly switch between them.  Similarly, if you take a lot of Portraits and quite a few pictures of Babies, you could set SP1 to Portrait mode and SP2 to Baby mode.
Very handy.  There are even specific modes in SP for Snow, Sport (action) and for taking photos of Flowers.


Friday, July 8, 2016

Fuji Finepix s8600

A note about the photos.  
These have been drastically reduced in size to make them download quickly.  The originals are more than 5 Megabytes each and much, much sharper.  This means you are not seeing just how good the image quality from the camera really is.  But even these low resolution pictures will provide some idea of what the Digital Super-Zoom cameras can do.

The Fuji Finepix s8600 replaced my Finepix s1500.  The s1500 had an optical zoom of 12x and digital zoom extended that quite a long way.  
The s8600 has optical zoom out to 36x.  The 2 x digital zoom takes maximum zoom to something like 72x though takes a bit of getting used to as the moon shots in this first section and the long distance photos below will show.  It is hard to hold a camera steady at those magnifications, especially at the slow shutter speed used in night time pictures.

Click on any image to see it larger, although it will still be in low resolution.

The first two were taken on one night and the other three were the following month on a not so clear night.  I was very surprised that at such a high zoom I could still see the definition of the craters on the first night very clearly.

All of these photographs of the moon were taken while holding the camera in my hands and not braced against anything,  All were taken with the camera set to 'SR-Auto' mode.  Using Scene Recognition Auto allows the camera to set the ISO, Aperture and Shutter Speed to a good average for the conditions.  In this case - Night.
I have taken thousands of photographs, but I've never really been interested in the photography itself.  I use photographs to record where I've been or moments that I want to remember.  I have rarely ever sat and deliberately composed a photo.  I know about the rule of thirds and depth of field, ambient lighting and shutter speed, but they have never really interested me until I began printing some of my happy snaps for commercial use.  Basically once I got a digital camera i set it to one of the 'Auto' modes and just pointed and clicked.
Then I discovered just how hard it is to try to fix a badly exposed or coloured photograph so that it would look acceptable on a wall or perhaps printed on a tee shirt or a coffee mug.  

When I had to choose a replacement camera it really came down to the usual decisions about the cheapest camera that would do a reasonable job, had a better zoom than the last one and that the zoom would work ok without a tripod, even from the deck of a moving yacht.  Because I am getting older and have had a lot of physical injuries my hands shake and I cannot brace myself in a set position for long,  The last option is becoming more difficult to find.  All my cameras use rechargeable NiMh AA size batteries.  When I travel I carry a single charger that can charge a mixed group of AA and AAA NiMh and my Li-Ion 18650 batteries.

I decided with this most recent camera to begin exploring some of the settings to take me away from Automatic Modes and look at getting better images.

In particular I want to explore:
Zoom, but maintaining reasonable detail.  This is hard to do at 72x zoom whilst using the camera handheld (no tripod).
Better, more vibrant colour.  I only discovered this little gem last week.
Composition.  I really don;t care much about the rule of thirds.  I take pictures for myself and I quite like the horizon splitting the frame.  But I should make a little more effort with composition in positioning objects in the frame.

The two photos above are of the same islets at standard Wide Angle, and at Full Digital Zoom.  They are approximately 4.5 kilometres away from the camera and taken on SR-Auto mode.

These two photos were taken looking from my balcony, along the beach to the jetty.  If you look very carefully at the top photo you can see the jetty almost in the centre of the picture.  Again, hand held - no tripod, and taken in Auto mode.  The distance from the balcony to the jetty is a little over a kilometre (1160 metres).  


The rocks in this next one above are a bit harder to see in the top pic, but again they are almost in the centre of the photo.  It was a hazy day and they are not very well defined.  The distance was 7.6 kilometres.


This last set of three are wide angle (what you get when you first turn the camera on), Full 36x Optical Zoom, and Full Digital Zoom.  Just to show the three standard settings.
Distance from the camera to the cliffs zoomed in the bottom photo was a little over 18 kilometres. Again, the day is hazy, but quite a lot of definition can be seen in the cliff face, especially considering they barely show at all in my 10x50 binoculars.

On a clear day, the camera is quite capable of far sharper images, and they would probably be better if I could be bothered using a tripod.  As it is, the haze can be cut and the detail brought out in a couple of clicks using the free image editing program GIMP (for Windows, Mac and Linux).  See the same image below:


So that is what you get using a camera that cost $167 (on special at Australia Post) using Automatic settings on zoom, without a tripod.

The next post will explore a first look at what happens when you play with a few manual settings.

Wednesday, July 6, 2016

Why Another Photography Blog?


Let's get this out there from the start.  I don't like blogging.  I'm a lousy writer and I don't have enough patience to maintain blogs.  I do however have wide interests and indulge in a lot of 'stuff'.  I write my blogs mostly so that I can remember things like how I solved a particular problem or how I learned to do something I might want to do again at some far off date.

One thing I have always done is take photos.  I started with my first 'Brownie Box Camera' using 620 film.  I still have one, and oddly enough found some film that has never been used in my office drawer last week.

I went through the Polaroid Land Camera phase and even had an expensive 35mm camera for a while, but once the little pocket 'Instamatic' was released by Kodak, I had a camera I could take with me on my travels.  The silly thing is that I just didn't seem to keep photos much, or take many.  I just liked having a camera because everyone seemed to.

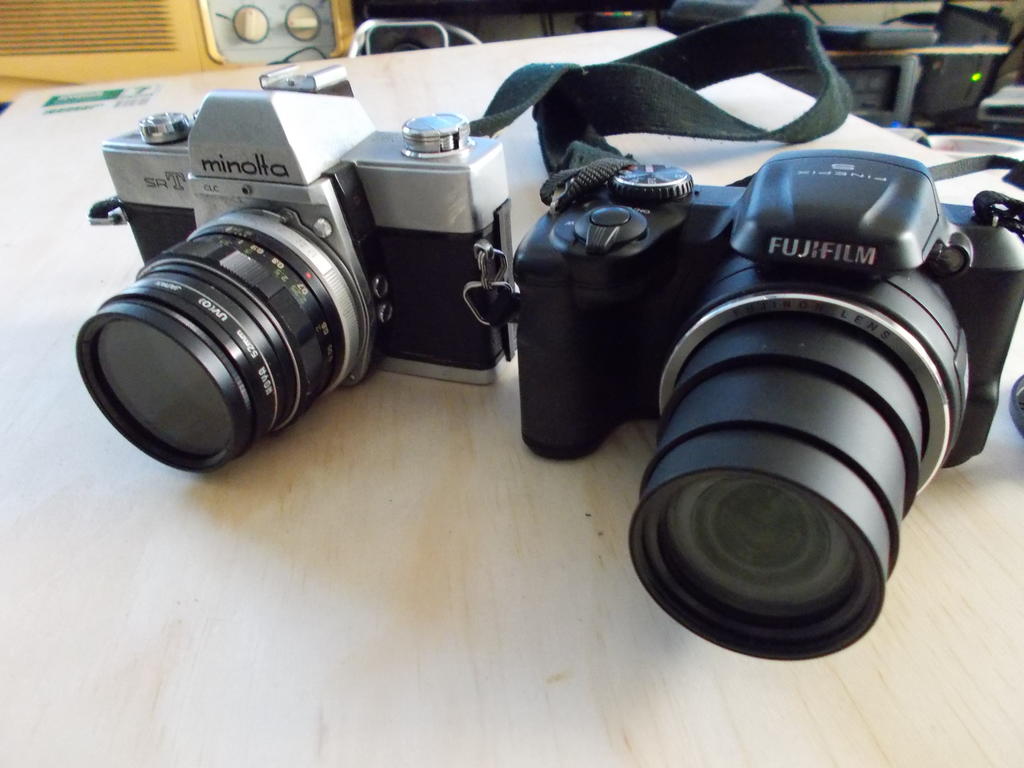
My last 35mm camera was a Minolta SLR, which I still have.


Some time in the 1990s in my computer business I had the chance to add digital cameras to my line of hardware.  I bought one to try out and showed it to a customer.  He immediately saw the value of being able to take a photo of the identification number on his products and store it on a photo along with the information about the customer who bought that equipment.

That was my first digital camera sale.
At the time I felt the images were just too grainy and focus was awful.  Things have changed.

I still used film until 2001, then I got a slightly better digital camera and started taking it with me on my yacht.

Now, I am not stingy with people, but when it comes to spending money on myself I am tighter than a fish's rear end.  I like stuff that works, but I don't look for 'the best' or the most expensive.  I look for the most affordable thing that will give me a practical result.  And I buy on sale.

For anything I will be taking aboard a yacht and carrying ashore in a dinghy it needs to be good and it needs to be cheap enough to lose.

That limits my choice in digital cameras.  After my first digital camera (a Hewlett Packard) I had a wonderful little Kodak that had great zoom, the best Image Stabilisation and a brilliant lens.  Sadly the Fuji lens simply does not compare.  The resolution of the Kodak back then was a little primitive, but the pictures were stunning.

When I dropped it in in flood waters in 2008 I discovered I could not get anything even close.  I pulled it apart and dried it and kept it orking for quite a while but eventually it died and I had to replace it.

Kodak was not available, so I saw a Fuji Finepix s1500 on special for about AUD$150 and bought it.  I have had that camera ever since and recently ity developed some glitches, probably from being exposed to salt for 8 years or so.

For pocket use I buy 5x Optical pocket cameras - usually Samsung, for about $65.  A while ago I went swimming with one in my pocket and could not get a Samsung anywhere, so I replaced it with a Nikon A10 for $68 (on special form $110).

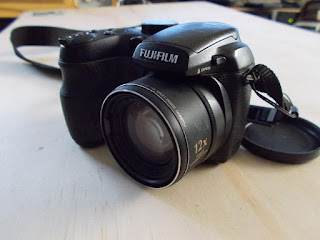
Recently I saw the Fuji Finepix s8600 advertised for about the same price that the s1500 had been, so it has now been added to my collection.

And now we come to the real reason for this blog.  For years I have used the s1500 as a point and shoot camera, basically leaving it on Auto or SP-Auto.

Recently I wanted to explore settings because the colours always seemed washed out.  And with my s8600 offering Optical Zoom of 36x and Digital Zoom taking that to 72x I am noticing the difficulty in focusing.

At first I thought it was simply because thge s8600 doesn't have a viewfinder, and trying to see if a scene is focusing in an LCD screen outside in sunlight is impossible.  Then I realised that the colours were still washed out and flat.

So recently I began exploring the semi manual settings.  And discovered there is not much information for beginners in these Fuji cameras.

I will not be getting into deep and meaningful technical stuff on Aperture, ISO and F-Stop.  What I am doing is for myself.  I will post some pictures of the same scene with some different settings so that I can refer to them and remind myself what works best for me in average situations.


Just a quick note on a few of the pros and cons of  DSLR vs Digital Compact Superzoom.

With current technology the DSLR will always provide a far nicer photo.  The Superzoom cameras have a very tiny image sensor compared to the DSLR and often the Superzooms use the older technology.

One Superzoom however can zoom in over a distance that would need half a dozen lenses on a DSLR.  I regularly take photos zoomed in across 10 miles of water while I am learning abotu my Fuji s8600.  There will be a few of those photos showing wide angle, 36x Optical zoom and 72x Digital zoom in the blog.

A DSLR almost always has a separate viewfinder.  Most modern Superzooms do not.  This is a serious disadvantage.  Trying to frame and focus in sunlight using even a good quality LED screen is a painful way to take photos - especially of you don;t have great eyesight.

Some Superzooms are slow to focus and slow to take each photo, although this can be partly overcome by using the burst mode, where one press of the shutter takes several continuous shots.

There are very few Superzooms that allow manual focus, and the Superzooms have a very limited range of Aperture selections.  DSLR cameras don't suffer this disadvantage.

Carrying a range of very expensive lenses for  a DSLR camera to cover all the possible photo opportunities can be annoying and inconvenient especially if you are travelling in a remote area.  For that reason a lot of professional photographers say they also carry:
A Compact Digital Superzoom
A Digital Pocket Camera
An iPhone

There are a lot more Pros and Cons, but those are a few of the things I considered before looking at my biggest consideration - Cost!

If anyone else has one of the cheaper model Finepix 'sXXXX' series and finds the stuff useful - then great.  And comments will be welcome.  Remember though this is planned to be just a quick start for beginners and some useful tips, like how to get over the problem of the lens caps falling off the Fiji Finepix models.